
LINKS TO FEATURED PAGES:
|
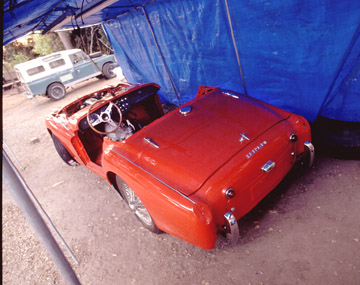
Restoring my Triumph TR3A was my introduction to body work. I did what I could but farmed most of the work out to a body shop. I learned a lot the hard way that could make the next restoration go much easier. This assumes that I live long enough to forget how much time and money is needed to actually do a restoration. Personally, it is an experience I hope I never repeat. The most important lesson I have learned is to purchase the best example of a car that I can find. It is way less expensive that restoring a car. This lesson, of course does not apply to those of you who find working on cars a relaxing fun way to spend your spare time. Lessons:
Before you startThe large majority of cars that get disassembled for a complete restoration never get reassembled. Of the cars that do get reassembled, many get sold before the restoration work is complete. This is usually because of lost interest or conflicts. Incomplete assembly projects are usually sold at a tremendous loss of money for the work done and new parts purchased. Before you start a restoration project think VERY CAREFULLY about what you are committing yourself to. If you have a family, you are committing them to your project as well. Be sure to get their support and agreement to the time and funds that will go to the project BEFORE you start. The project will take a lot more money than you think it will and it will take a lot longer than you think it will. You will need to invest constant chunks of your time. Time that will take away from everything else. Once the car is apart if you stop devoting regular time and money you will loose everything. You will need:
Think long and hard before you start. You may be better off selling your car and replacing it with one in better condition. It would certainly be cheaper.
Working practices that I have learnedMy working habits changed a lot over the length of this project. Early in the project, I often spent more time looking for a tool than using it. I have also had a number of parts hide in an alternate universe until I gave up looking for it and purchased a replacement. I also learned that if you drop parts through the car they will often escape and hide unless you plan for the recovery of dropped parts. A tarp or large sheet of cardboard placed below the area you are working on will accomplish two things. It will cushion the fall so the part is unlikely to bounce away and it makes the part easier to see and recover. I have established locations. By locations, I mean places to put different things. I make use of the lids from white plastic five gallon containers. They have a rim around the edge to keep things inside. I keep one or two beside me while I work. The lid is where I place a tool that I am using when I temporarily put it down. A lid is where I place a part that ether just came off the car or is just about to go on the car. Searching for that tool or bolt that you just put down gets old quickly. A professional mechanic once told me you could judge a mechanic by how dirty he/she is and how clean his/her tools are when he/she starts to use them. I have learned to have lots of clean rags on hand. When ever possible, I will clean the car before working on it to get rid of the grease. Since greasy hands not only affect your grip, but allows dirt to get on parts that I am assembling, I wash my hands when they get grungy. I also wipe off each tool before I put it away. I have found that staying cleanish during a project is a moral booster. A project this size can become overwhelming and never ending. One thing that I did that saved me from becoming overwhelmed and abandoning the project was to break it down into lots of little sub projects. Each little sub project was designed to be easy to accomplish in a reasonable time frame. I focused on the sub projects, one at a time and achieved a sense of completion when each sub project was completed. When I reached the stage of assembling the car, I set myself a goal of a certain number of parts installed a week. I made it an easy number to obtain to allow me to deal with difficult parts and still meet my goal. Sometimes little tricks of the mind can make all the difference between a completed project and an abandoned one. I have learned to document any disassembly that will not be reassembled within a few hours. Things that look simple before disassembly often become puzzles when it is time to reassemble them. I have found the factory parts manual to be a great help. Before starting, I photocopy the relevant page(s) of the parts manual showing the assembly to be disassembled and make notes about assembly order and similar stuff on the photocopies. Before parts of a wiring harness gets disconnected, I note where each wire goes. I found that this was a BIG time saver. When replacing a harness with a premade replacement harness, cut off the old one leaving a couple inches of wire at each connection. This speeds thing up by allowing you to match insulation colours.
Tools:
Parts:
Disassembling the car and prepping itThe best way to start a restoration is by having the engine bay and underside steam cleaned. It will make the job go a lot easier and faster. If the underside of the car is undercoated have the undercoating removed at that time. It's a nasty job to do yourself and it should come off just to see what is underneath. If there is a pinhole in the undercoating, moisture can get up between the body and the undercoating and start large areas of rust under the undercoating. If the original paint is in decent condition and still adhering properly leave it on. It sounds neat to be able to say "I took it down to the bare metal to make sure that everything was perfect". But your new primer and paint will not adhere quite as well as the original did to new sheet metal. Unless you are in the Arizona desert during the middle of summer, you will probably introduce some moisture to the sheet metal and actually get a slow rusting started. If you remove original factory paint that is adhering properly you will dramatically increase the possibility of future rust coming up from under the paint. The solution used for dipping cars to strip paint is very caustic and will start the body rusting if every trace of the dipping solution is not removed. This stuff is VERY difficult to get out of seams. It is not unusual to see rust bubbles on a dipped car around the seams within a few years of the restoration just because some of the dip solution was left in seams. My advice is leave as much of the original paint on as possible only going down to bare metal at rust areas. Most of the time there is no real good reason to remove the car's body from it's frame. It is nice to say that you did a "frame off restoration" but it is a lot of work that you seldom really need to do and it increases the risk of body panel damage. Floor and sill replacement is easier done with the body attached to the frame. The frame positions the body. You can see everything you need to see with the body on the frame. Also suspending a body at each end tends to take it out of alignment and decreases the chance that the doors, wings & lids will refit properly. If you end up replacing an inner sill, trial fit the door with it's hinges in place before welding it in place. The shop that did mine did a trial fit minus the hinges. The door opening was about one quarter inch too narrow when they completed the job. Note any captive nuts or nut cages that need replacing and have them replaced before final prep is done. Run a tap through all the captive nuts soon after disassembly to check their condition in the cage. When in doubt replace the nut and cage. Make a trial fit of any panel that is new to the car before it is painted. Chances are that it will not fit smoothly and will need to be tweaked to get a good fit. Let an experienced body person do this. Prepping a car for painting takes a lot of low tech time consuming work. I found that I could sand just as fast as a pro who is getting sixty dollars an hour to sand your car. This is a place where some real money can be saved. I have tried several types of chemical paint stripper and have had problems with everyone. Particle blasting sheet metal is risky. The material tends to stretch the sheet metal causing it to bend. I have heard of entire bodies being destroyed by someone doing high pressure particle blasting on the entire body. The best place to particle blast is corners, edges, ribs and other reinforced areas that may be hard to sand. Even there, you should use as low a pressure as possible. Power sanding can destroy panels too. You want to use an orbital sander to minimize gouging caused by the edge of a sander. If you sand in one spot, you can scrape out a lot of sheet metal. The sander can also warp parts of unsupported sheet metal if the metal gets too hot. Use an orbital sander in as large of strokes that you have space for to avoid overheating a spot of the panel. Do not wet sand primer or body fillers. Primer and most body fillers are porous to water. This allows water to sink down to the metal and start rust under the primer or body filler. I repaired deep rust craters in my car's boot floor...twice. The first time I wet sanded the filler to get everything as smooth as possible. After painting, it looked like a new panel until the rust popped back up. I got to take it back down to bare metal and do it over again. Dry this time. Rust through pinholes can be patched up easily by welding. Larger rust through holes can be repaired by cutting the uneven hole out of the panel and welding a new patch of metal in its place. Rust craters can just be filled with body filler once you have removed every spec of rust.
Dealing with the body shopBody shops are in business to make a profit. They charge a certain rate to cover time and overhead. Anything you can do well yourself instead of farming it out is money saved. Any work that you did that the body shop needs to redo is time wasted. Final sanding and cleaning must be done just before applying the primer. Primer applied longer than a day or three before final coating needs to be resprayed before a final coat is applied. Do not use multiple heavy layers of high fill primer. The thick primer base will allow the paint to chip easier. If you have thin scratches or uneven surfaces use a body filler or "mud" to fill it in and not a high fill primer. This provides a stronger base for your final paint coat. Also keep your layer of "mud" as thin as possible to accomplish the job. Body shops can not be held responsible for fillers or primers that you have added to the body. They have no idea of what is underneath or if you applied the stuff properly. Do not expect them to warranty ANYTHING they add over your work. If you want any fillers or paint that they add guaranteed, let them have the car when you have finished sanding off everything you think needs removing. Before you go out and get an estimate for a job, carefully define the work that you want done in writing and make sure the estimate covers each step. This is VERY IMPORTANT. The cheap bid is often cutting a lot of corners and the expensive bid is often covering all the details to do the job right. When creating a description of the work to be completed spell out every step. This is the document that will define the work that they will do. It provides a basis for comparing estimates. If you want panels aligned, state it. If you want the car undercoated, state what you want done under the undercoating. Some garages will provide a cheap estimate by not doing anything under an undercoat, or even shoot undercoat directly to bare metal. If you want a thin skin of mud applied to the body to remove any little dents or waves in a panel state it. Go over every part of the car and describe what you want done to each rust spot and dent. Remember this is the document that they estimate to. You should expect them to do whatever is in the document. Expect to pay extra for anything not covered in the estimate. It is cheaper to have a shop estimate and complete the entire job than to bring it to them one step at a time. They have to add a little fudge time for each job they bid in case of problems. Also you are more apt to get a slight price break on a large job than in having each step estimated and completed separately. Having everything done at once will cost a lot more in a short time but will save you a significant amount of money by the time everything is completed. Prepay as little as possible. A hungry body shop will back burner a prepaid project in favour of a job that is not prepaid to maximize their money intake. If the company insists on a partial prepay try to arrange payments based upon reaching stages of completion. When they say a stage is completed go in and inspect the work completed prior to paying. Some shops may cut corners if they can without your notice. Some employees may work slow and cut corners that their boss doesn't notice. And sometimes, there may be a miscommunication. You want to catch these things when it is simple to correct problems. I insist on inspecting any body work before it is covered. This means before primer or undercoating is applied. I want to see doors and panels trial mounted after body work has been completed.
Getting the project paintedI get a lot of people emailing me for the formula for signal red. Here is a formula that came directly from the BASF technical dept for #21 Glassodur Urethane Acrylic paint This is off the label:
I had my car painted in several steps. They used s primer that was also a sealer so that I could do some work between steps. On the first step, I brought the stripped down body tub into the shop on the frame. I had them prime and seal the entire body tub. They put a color coat on the underside, inner wheel wells, engine compartment, interior and boot. Any surface that would be covered during the body assembly was painted. I had the undercoating applied after the paint was dry. When this was completed, I brought the body back home then let it sit for a week while the paint hardened. The paint shop primed and sealed all the other body panels off the car. The insides of wings, doors, bonnet, boot lid, front valance and and sections that would be inaccessible after assembly were painted with final color. Next I installed the engine, transmission, steering column, all the hydraulic tubing, the radiator and other parts that are best assembled with parts of the body apart or are likely to scratch the paint during assembly. The body panels were replaced on the car. They wings were held in place with a minimum number of screws.
The assembled body was returned to the paint shop for final prep and exterior spraying. The colour match of every exterior part as guaranteed by having all the exterior sprayed at one time. Any assembly scratches were repaired at this time.
I brought the car home to install the interior and all the other parts.
ReassemblyI used new fixings wherever possible to make reassembly go easier. When I had to reuse a bolt I ran a die over the threads first. Whenever I had to reuse a nut, I did the same with a tap to make sure that the threads were clean and to ease assembly. I noticed that a lot of used parts that looked good when they came off suddenly looked shabby against new paint. A number of parts were replaced with new ones or sent out for rechroming at this time. This is where those diagrams that I made during disassembly became worth their weight in gold. They made reassembly a lot easier. I tested each system or subsystem as soon as it was installed. It gave me a sense of accomplishment then the hooter hooted, the turn signals flashed and the overdrive solenoid clicked at the right times when the gears were switched. It seemed a lot easier to ring out each subsystem when its instillation was fresh in my mind than wait and try to do it all at once.
ChromeCompanies that provide parts for your classic need to remain price competitive with each other and tend to source parts as cheaply as possible. This often means that the chrome on new parts is very poorly done and will start rusting or pealing within a short time. If you want good quality chrome that will last, you are much better off having your old chrome part rechromed than purchasing a new replacement part. The new part may be cheaper than having a quality chrome job done. That in itself should tell you something about the quality of chrome on the replacement part. Also your original part may be made of better material than the modern replacement. If it is not worn or damaged strongly consider getting it replated instead or replaced. Chrome should be protected as quickly as possible. Use a high quality chrome polish on the part as soon as you get it then follow it up with a good wax. Remember to polish then wax your chrome frequently. You went through a lot of expense and effort to purchase and install those parts. Protect your investment. |
|


© 1997 - 2017 TeriAnn Wakeman. All rights reserved.