
This is the saga
of TS75519L's rebuild. It is a continuation of this car's known
history . It tells of a car rebuild innocent learning about
almost everything that can go wrong. It is a tale of tenacity
in the face of adversity proving that a car can be completely
rebuilt on dirt without a garage in spite of the efforts of trained
professionals. It is also a tale that proves the law of the innate
cussedness of inanimate objects.

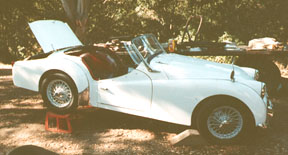
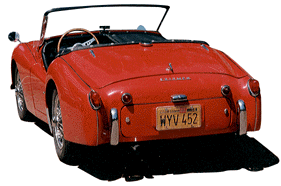
A picture of my TR3 taken before the beginning of
the rebuild. The shinny Chevy white paint hid fillers over severe
rust. Bubbles had been appearing in the paint over the previous
year.
I took my car off the road for a "freshening up" in January of
1989. During the previous October Triumphfest I self judged her
and decided she was a few points shy of the bronze funcourse award.
I thought that since I was going to have to rebuild the engine
I might as well take care of the steering and freshen up the car
well enough to bring her into a condition good enough for a solid
silver and maybe within reach of the gold funcourse award.
My freshening up goals were simple:
- rebuild engine,
- rebuild front steering,
- repaint the black engine bay and the black boot area to match
the body colour,
- install a new interior,
- replace the wiring harness,
- sand down the body where paint bubbles came up, remove any
rust and spot paint it.
I calculated that I could have the job done in about 5 months
and be back on the road sometime in June to spend the rest of
the summer touring with the Triumph
Travelers Sports Car Club. Like I said I have never done this
before.
I first removed the interior that I was planning
to replace. The fuel tank was removed and sent to a radiator shop
to be boiled out and had deep rust areas patched.
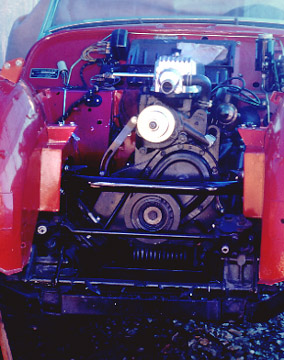
Early during the rebuild. The front clip, engine
and gearbox have been removed. The rotted out battery box has
been removed. I was right on schedule
Everything I took off was badly worn. When I stripped the interior
I discovered that the car was signal red from the factory and
that the floor was coated with fiber glass under the paint and
that there were great gaping rust through holes on the floor under
the fiberglass. I decided that meant new floor panels and that
I could have a body shop install them and still meet my deadline.
I removed the doors to make the work on the interior easier.
The door metal around the hinges were badly fatigued and there
were fatigue cracks going through the metal on at least two sides
of each hinge on both doors. Also the bottoms were severely rusted
with a lot of rust through holes. I located a pair of good condition
used doors for a reasonable price through the British
car e-mail list and decided to replace the doors instead of
having them completely rebuilt. It would save a lot of time and
maybe I could still make schedule.
The fuel tank area had lots of rust, some of it very severe with
small rust pit holes going all the way through. All the badly
rusted areas were under the felt pads that sit between the fuel
tank and the body. I decided to remove all traces of rust there
and weld the holes shut and build up the rust craters. Even though
no one would see it, I wanted it perfect.
The tank had several deep rust pits as well. I looked at several
used ones for possible replacement since new ones were not available.
They were all as bad or worse than mine where they had touched
the felt pads. I finally opted to have mine repaired. It was boiled
out and new metal was welded into place where the deep rust pits
were.
After I stripped the interior, I started on the front of the
car in preparation for the engine removal. The underside of the
front valance had some surface rust and a fiber glassed rust through
section on the underside. Well I could have the body shop weld
in some new metal where it is rusted through while they replaced
the floor panels.
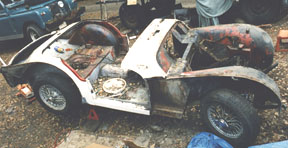
The car has been stripped. All the body parts
are carefully placed so as not to damage the paint. The plan at
this time was to put the panels back on without repainting. I
knew by now the doors and floor needed replacing. by this time
my schedule had slipped about 2 months because of additional work
that needed doing.
I sanded down the lower front wing panels where rust was bubbling
up through the paint. More fiberglass over bad rust through areas.
I was getting a very bad feeling about this. I looked in the catalogues
and decided to purchase a pair of lower wing repair panels and
just replace the metal. This was going to cost a whole lot more
than I thought and take more time at the body shop. Maybe I could
rejoin the club tours in July or August.
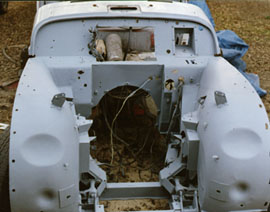
The engine bay had been taken down to bare metal
primed and sealed. The new battery box was due to be added next.
At this time the plan was not to repaint the exterior.
With this many areas requiring repainting I decided it would
make sense to respray the entire body. Since I do not pay myself,
I decided to do a colour sanding of the body so I would not have
to pay the shop for it. I was sanding the rear of the prefect
looking rear valance and put my hand through the body. My heart
sunk down to my feet and I had the feeling that my feet were no
longer touching the bottom. I was definitely in the deep end of
the pool without swimming lessons.
I walked into the house, checked the Moss
Motor's catalogue and ordered a new rear valence on the spot.
I grabbed a bottle of ale, went back to the TR and sat there staring
at her. A sane person would put the car up for sale to an experienced
car restorer and look for another car at this point. But I had
almost three years of recent fond driving memories. Besides I
was never very good at this sanity thing.
I decided that all the paint had to come off just to see what
was lurking underneath. The freshening up project that had been
growing larger as each bit was removed had just now turned into
a genuine full blown complete restoration project . That meant
no club touring this year. With luck the car would be ready at
the beginning of the following touring season. I told you I had
never done this before and I was totally naive about how long
it takes to get things done... And how long it takes to learn
how to do the work and redo what I botched the first time.
There is a phrase used on the British car e-mail list and many
of the British marque e-mail lists that the original list has
spawned. The phrase is "shipfitter's disease". The person who
first defined it on the British car list in the spring of '89
defined it thus:
" A boat owner noticed that a light bulb was burned out in the
cabin and went to replace it. While replacing it he noticed that
the socket was cracked and decided to take care of it while he
was at it. After removing the fixture he noticed that the wiring
insulation was frayed. Since he already had the fixture off it
seemed like the easiest time to replace the frayed wiring. He
removed the wiring and exposed the wood underneath. He could clearly
see dry rot on the beam. Well since he already had the wiring
off... And before long, the boat was in dry dock undergoing a
complete refit because a light bulb burned out in the cabin."
This phrase was first coined on the British car e-mail list to
describe my freshening up project when the tales of woe were sent
out to the list by a disheartened woman looking for comfort in
the sight of a badly rusted TR that had looked pretty good.
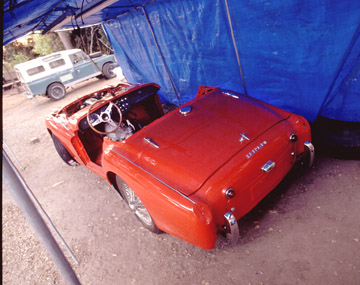
Did I mention that I do not have a garage? I erected a pipe frame
over the car and hung a tarp over the frame. So all my work has
been done in the dirt or mud at outside ambient temperature.
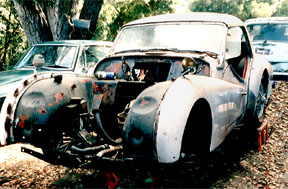
Removing the Chevy white paint gradually exposed a severely rusted
TR3A. It looked like the previous owner wire brushed the rust
then covered it with fiber glass and paint. A trick I could not
repeat and feel good about the car. Maybe that is why he sold
it before even finishing the project? At least he felt bad enough
to sell her well below the current market price for what she appeared
to be and closer in value to what she was under the paint. At
the price I paid I did not feel ripped off, and I did get almost
3 years of driving fun out of her. That driving time had me hooked
and I wasn't about to let a body that looked like swiss cheese
keep me from driving her some more! Like I said, I was never very
good at this sanity thing but I am fairly good at rationalizing.
After I stripped the car she went into the body shop for professional
help. I decided to leave the frame alone because it was in excellent
condition. I also decided to leave the body on the frame. I could
not see any reason for removing it other than to be able to say
I did a frame off restoration. And I had heard too many stories
of bodies going out of alignment when handled off the frame. Besides
it was easier to move with wheels under it.
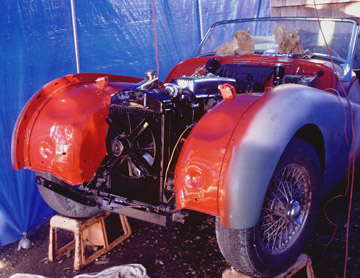
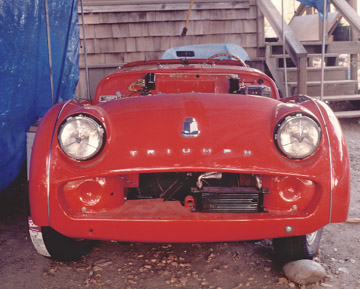
My TR3A had the wrong bonnet so I purchased the correct post
TS-60000 bonnet. The boot lid had a lot of rust through holes
covered by fiberglass. I picked up a very good condition used
boot lid to replace the original. The front wings were rebuilt
using new lower wing panels. The car got new floors, inner and
outer sills and rear valance. Several sections of Swiss cheese
like rusted through metal were cut out and replaced with new metal.
The dog legs behind the doors were rebuilt with new metal. Every
bit of rust was removed from the car. Previously hidden damage
around the base of the windscreen was repaired.
Counting the "new" doors I estimate that between 60 and 70% of
the car now was made of new metal or replaced used rust free body
panels
Needless to say this cost me a chunk of change. So much for my
cheap car. I did not have enough money to get the car painted
at that time so I had the car primed and sealed, and an undercoat
added on the underside to help guard against moisture damage then
brought her home for more work. Meanwhile my first and second
target completion dates had slipped into remote history and I
had given up on the concept of a completion date.
After the car came home from the body shop I tackled the suspension
and steering. When I removed the front coil springs I discovered
that one was an original and the other was the taller factory
replacement spring. The taller spring was supposed to be installed
with the aluminum spacer removed. It still had the spacer installed.
This meant very different front spring tensions and lengths.
The trunions were very badly worn and the arm of one was sheared
off where the fixing bolt would have been. The trunions were so
badly worn that they wobbled past the steering stops. The various
bushings and joints had seen better days too. The worm gear was
showing some wear and the bearings in the steering box were not
in good condition. It looked like it had run dry for a long time.
When I disconnected the arms to the rear shock absorbers I discovered
that they were there solely for ballast. The arms flopped down
to the bottom position without any resistance. No wonder the car
handled so poorly.
I replaced the springs with the factory competition style, the
front shocks with new SPAX adjustable shocks. New trunions, bushings,
tie rod ends and ball joints were installed. I sent my steering
box to The Roadster Factory to have it rebuilt with new bearings
and worm & peg. New brake calipers went on the front. Apple
Hydraulics rebuilt the rear shocks using heavy duty valves.
When I was driving the TR, I was just starting to get into auto
crossing so I decided I wanted to build the engine with a bit
more power and strengthen the weak areas. About that time I met
Ken Galanders, learned about the competition engine stuff he was
selling and got carried away.
The insides of engines need to be very clean. Working outside
in the dirt I decided that I did not have the facilities to rebuild
the engine and keep it clean.
There is a car repair hop near my home called "Greg Solo's Engine
Room". Greg Solo is into building and racing Morgans that have
the same Triumph engine that my TR3 has. I decided to farm the
rebuild out to the Engine Room and have it done right by TR race
engine experienced professionals. I ordered the engine built to
certain specifications and provided a lot of special parts that
I purchased from Ken Galander's company, British Frame and Engine.
About this time I made a "dumb" decision. I just LOVE the look
of multiple DCOEs. For years I have WANTED a car with DCOEs. I
just HAD to have a set of DCOEs. I say this was a dumb decision
for three reasons. One, SUs are simpler, I know how to get them
to work and I have a pair. Two, SU's work very well on a TR engine.
Probably better than the Webers under most conditions. And three,
I can not auto cross in a stock class with DCOEs.
So I made the decision to have a set of Webers for street driving
and touring and keep my SUs for auto crossing. The plan was to
switch between carbs, manifolds & linkage depending upon what
I was doing. There was no logic here. Just pure & simple desire.
So I ordered a new pair of DCOE45s built down to 42 specifications.
When I got enough money ahead I asked my local automotive paint
store owner for recommendations for a local company that did a
good job of painting at a reasonable cost. The recommended Felton
Auto body.
I had the car flatbeded over for them to do stage one of the
painting. Stage one was to sand, reprime and paint the interior
of the car. This included engine bay, boot, spare tyre compartment,
fuel tank area, underside of the front valance, bonnet, boot,
spare tyre compartment lid, door interiors and painting all the
body and wing overlap seams.
The painter complained that the "mud" applied by the body work
company to even out manufacturing panel waves was way too thick.
He said that it would probably crack from vibration. So I got
to pay extra for the new company to undo some of the work from
the old company.
When the stage one painting was completed I brought the car home
and plumbed the new hydraulic system. I have lived through four
hydraulic failures caused by pinhole rust through leaks in the
steel tubing. On the first, I pulled a James Dean imitation and
bailed out of my car just before it went over a cliff. So the
Triumph got stainless steel brake lines.
I installed the refinished instrument panel, fuse box, solenoid,
voltage regulator and the wiring harness. Next the refurbished
and newly painted fuel tank was installed. I installed the newly
rebuilt steering box and discovered that the steering was very
hard. I disconnected the rods and isolated the problem to my new
steering box. So it want back to The Roadster Factory for a warranty
fix. It came back working properly and I installed it with no
problems.
I got the newly rebuilt engine back form the Engine Room, mated
it with the transmission and installed it into the car. The radiator
and front valance went on. I went to hang the doors and discovered
that the door openings were about 1/4 inch too short.
I went back to the company who did the body work. The person
who did all the work had been fired shortly after finishing with
my car because the owner discovered that he was coming into work
on Heroin. He discovered this after a number of cars the person
worked on came back because of poor work. The owner took back
the car to lengthen the center section 1/4 inch. I got the car
back about a month later with the doors hung.

I put the wings on with a couple of bolts and brought the car
back to the paint shop to have the outside painted and some scratches
I made installing the engine repainted. While I was installing
the engine & other major interior stuff and having the car
lengthened, the paint shop I was working with had gotten into
financial problems. A partner estimated a number of jobs low,
emptied the company bank account and left. The remaining partner
was loosing money doing the jobs that were under estimated. I
had to prepay for my paint job just so he could purchase paint
and keep the electricity on to do the painting. I paid for a colour
coat and to come back after the car was assembled for last touch
ups and to have the car colour sanded and clear coated.
The car got painted and flatbeded home. I mounted the wings,
replaced the old worn crooked wire wheels with new Dayton chrome
wheels & splines. I discovered that the new stone guards do
not fit properly to the leading edge of the rear wings. A call
to The Roadster Factory confirmed that the reproductions do not
properly fit. So I bent them and got them to fit.
Around this time a heavy storm with high winds collapsed the
roof over my TR. The only damage was a cracked windscreen and
a little chip of paint off a front wing. This provided me with
the opportunity to have a new windscreen installed and to rechrome
the stanchions.
As I continued assembly I discovered that my new door sill finish
panels didn't fit properly and had to grind them a little. I went
to mount my freshly painted bonnet and boot lid to discover that
the body shop did not make any trial fits so the fit is poor and
gaps are uneven. I went to install the newly rechromed and reglassed
windscreen and discovered that it would not fit properly with
the stanchion spacers installed. When the body shop repaired the
cowl damage they built the corners up too high and checked fit
of the windscreen without the meal sliders that go between the
windscreen and the body. The windscreen fits without the sliders.
I went back to the paint shop to see if they could redo the top
edges of the front scuttle and take care of a few other things.
The paint shop had closed down. I had a bunch of stuff still there.
The building owner had come through and sent a lot of stuff to
the dump including all my rear body cappings, the sticks for the
hood, scuttle vent and opening hardware and a few other bits that
needed painting. Luckily my hard top was sitting in the yard out
back and I was able to retrieve it. My prepaid colour sanding
and clear coat had disappeared along with the company.
At this point my morale was at a low point. I wanted to do it
right and have everything turn out perfect. I gave up on the project
for about a year. Meanwhile condensation from the rains &
mud had affected the finish of polished work under the bonnet.
My roommate's little dog urinated repeatedly on my new chrome
wheels and her cats were spraying there too.
I finally decided that I had to either finish the rebuild or
sell it. So I started hanging parts back on it. I added DOT 5
fluid to the hydraulic system and pressure bled it. Next day I
discovered that I had not tightened down a connection to the reservoir
and the DOT5 had leaked out. I was REAL glad I did not use DOT
4. The rear wheel cylinders started leaking a week later. The
system had new everything except rear cylinders. This is when
I leaned that you need to use all new rubber when you go from
DOT 4 to DOT 5.
Next came the mile stone of starting the engine for the first
time. I checked all the rocker arm gaps just to be sure, removed
the spark plugs, and squirted a little light oil into each cylinder
then poured half a quart of oil down the push rod tubes to be
sure that the lifters and cam lobes had fresh lubrication. I spun
the engine until I got oil pressure indicated on the gauge.
I added fuel, hand pumped it into the carbs, reinstalled the
spark plugs and fired the engine up. It wouldn't idle properly
but it ran and the oil pressure looked good. There was lots of
oil being fed to the rocker arm assembly. I replaced the cover.
As I was checking things over I noticed that the temperature was
getting high and the electric fan had not come on. I shut the
engine down and checked the fan circuitry. The circuit was OK
but the fan motor evidently died sitting out in the weather for
eight years.
I replaced the fan with a new one and took the car out for a
run. The carb linkage was set up wrong with the pedal sitting
WAY too high. The new starter motor stopped working during one
of my stops to check things out and the carbs were definitely
not running correctly.
Since I had four tube headers on the car, replacing the starter
motor means removing intake and exhaust manifolds. I was feeling
discouraged about how this project was going and just totally
lost the heart to continue. It seemed like no matter how hard
I tried, how pure my motives everything that could go wrong did.
Meanwhile, some exciting Land Rover events were coming up so
I just parked the TR and went out and played in the Land Rover
taking numerous long expeditions. Life was a lot more fun with
a car that worked and was reliable.
Finally during winter of late '98 I got back to working on the
TR after letting her sit under her shelter for over a year. I
was dismayed to discover that my new wheels, bumper, bumperettes
and head lamp rings were all rusting. I removed the starter motor
and checked it out. It turned fine on the bench. I finally located
the problem. I had a well painted engine block and a well painted
starter motor. The fixing bolts had flat washers that did not
dig into the paint. Basically the paint was insulating the motor's
ground return path from the grounded engine block. I removed the
paint from the mating surfaces and the motor worked fine. When
I reassembled the linkage I adjusted it for the proper pedal height.
I retorqued the head, reset the rocker arm gap and tried it again.
I was still having fuel system problems. I took her out and ran
out of gas a couple of miles away from home. My professionally
rebuilt fuel gauge did not work.
I got a gallon of petrol and headed back for home to have the
car stop with fuel starvation going up a steep hill. By this time
it was getting dark and I had just discovered that the car had
no tail lights. I called for a flat bed tow home.
Next day I cleaned out a very dirty sediment bowl, changed a
clogged fuel filter & added fuel. I was back to where I was
before the last drive.
I checked the wiring and noticed that all the red wires went
to lamps. The wire from the switch required an inline fuse and
did not come with the wiring harness. I didn't notice that when
I was connecting the harness. I added a fuse line between the
side lamp switch position and the red wires. I had tail lights
and gauge lights. All the lamps needed was a source of voltage.
Ooops.
I checked my fuel gauge. It worked before I took the car apart.
It went out with all my gauges to be rebuilt and refinished professionally.
When I first put petrol in the fuel tank I noticed that the gauge
only went up about half way. The problem was not in the sender.
So I sent it back. I reinstalled it when it returned.
Now it doesn't work at all. One lead has 12V. The other rings
out to go directly to the sender unit. The sender unit ground
is OK. The sender unit float is OK and the resistance changes
as the float arm raises & lowers. I looked closely at the
gauge It reads empty when the sender is disconnected. When it
is connected (with fuel in the tank) the gauge pins to the less
than zero stop. Fuel gauges are thermal and not polarity dependent.
I think the company replaced the guts of my gauge with one that
works in the opposite direction. It is now on my list of things
to take care of. A third time.
I took the car out on a couple of short runs to identify and
work out additional problems. On the second run the car stopped.
I determined that there was no fuel going to the fuel pump but
there was fuel in the tank. When I disconnected the fuel line
at the pump nothing came out. The car was flat bedded home again.
Next day I removed the fuel tank and gave it a through internal
cleaning with a hose. Lots of sand, grit, a piece of bark, some
dead sow bugs, a spider web and other unknown stuff came out.
So much for my tape covered inlet while all the final body work
was going on. I drained the tank and dried the interior with a
hair dryer. After I was satisfied that it was dry inside I reinstalled
the tank and added fuel The sediment bowl and filter has stayed
clean and my fuel blockage problem was cured.
The engine was still not running properly. I drove the car to
Greg Solo's engine room because Greg asked to see it. He wasn't
there that day. When I went to start the TR to head home it would
not start. The plugs were not getting any spark. A check of the
points revealed that they were not opening. It turns out a brass
bushing holding the distributor shaft in place had worn so much
that the shaft had too much lateral movement to open the points.
I got a used distributor installed at the shop.
After the mechanic installed the distributor he made a quick
look at the DCOEs and determined that the idle circuits were not
working on three of the four venturis. One of the problems of
letting an engine sit with fuel in the lines.
I drove the TR home and cleaned all the jets, air correction
tubes and emulsion tubes. The inside passages were cleaned out
and air was blown through them. For being a very complicated carburetor
I'm amazed at how much work can be done on them without removing
them.
When I next fired up the engine the carbs worked a LOT better.
Unfortunately they were still running way to rich. The carbs are
way over jetted.
Oh did I mention that my new electric fan stopped working? I
checked the fan and isolated the problem to the sensor. I replaced
the sensor and control module and started driving the 3 on very
short trips.
A week later the starter motor bendex flew apart as I was trying
to start the car. This was a recently rebuilt starter motor. I
purchased it just so that I would have a good condition care free
motor. At least that was the theory. The motor was the newer type
with the bendex secured by a clip ring. The clip ring flew off
and most of the bendex parts ended up behind the flywheel, inaccessible
inside the bell housing.
So I decided to bight the bullet and had the car flat bedded
to Greg Solo's Engine Room. They removed the transmission and
the bendex parts. The DCOEs received some new jets and expert
tuning. The engine got a new distributor set up for mechanical
advance only. The new old starter motor was replaced by a new
geared starter motor that is a lot more powerful, smaller and
turns the motor faster. I had a number of little things done that
I had not gotten to yet. Less than a week after I had the TR towed
in I was able to place her on daily driver status.
I still need to hang a few more parts onto the car. I need to
get the assembly scratches painted over and replace the new chromed
parts that started rusting before the car became drivable. But
she is now on daily driver status. And I am learning to smile
again when I look at my TR3A.
After a few months I picked up a used TR3 fuel gauge at a British
car swap meet. So I now have a functional gauge.
I discovered a leak in the rear differential plate. The plate
had been damaged in the past and was slightly distorted near a
sealing surface. The damaged plate was replaced with a new Magnesium
plate that has much superior cooling and a larger diff oil capacity.
While I was replacing the differential cover, I noticed that
a steel hydraulic line was flattened where it ran along the front
side of the axle housing. When a car is loaded on a flatbed, they
place hooks at the rear (around my rear axle housings) and pull
the winch in to take out any slack in the chain/wires holding
the car on the flat bed. It looked like a hook was placed over
my rear brake line. I replaced that line and discovered that the
brakes work better if you use all four of them.
Fuel mileage has averaged 16 MPG with the DCOEs installed, and
the spark plugs have been fuel fouling at about 2000 miles. I
contacted Pierce manifolds and received jetting recommendations
for my engine. I purchased a set of new chokes, jets & emulsion
tubes and installed them. I was told that DCOEs needed low fuel
pressure in the neighborhood of 2 pounds pressure. Otherwise the
carbs would not run properly. I added a Holly fuel pressure regulator
and Russell fuel pressure gauge. As a result I discovered that
my fuel pump is putting out almost one pound of pressure maximum.
I rebuilt the fuel pump with a new kit.
At this point my TR3A is a quite dependable driver so I'm more
interested in driving it than working on it. As it's first winter
as a born again driver approached, I got the hood sticks refinished,
and installed them with all new straps and fixings. I added the
snaps to the new white hood and installed the door pockets for
the side curtains.
Checking the timing I discovered the resprung distributor is
advancing at 500 RPM. I've decided to bight the bullet one more
time and save up for a Mallory breakerless distributor. It is
designed to have the advance curve easily and exactly set. I still
need to replace my rusted new chrome parts and am collecting them.
This time as I collect them, I'm waxing them right away before
they go onto the TR3A. I'll break down and get the bumper and
overriders properly rechromed.
One of these days I hope to complete the rebuild.....
|